Greenhouse "Butterfly" do it yourself
Mini-greenhouse "Butterfly" is suitable for any suburban area. It will be a way out if the area does not allow to place a large greenhouse. You can do this greenhouse do it yourself.
On the suburban areas are often found greenhouses made of polycarbonate. It is lightweight and durable material. Thanks to him, any design will gain strength and will serve for years.
Design features

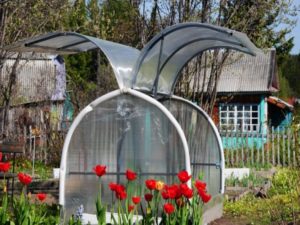
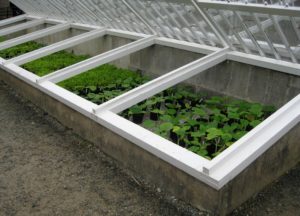
If you lift both greenhouse covers at the same time, it will look like a butterfly spreading its wings. When closed, it resembles a small cocoon. Its tightness creates the necessary level of humidity and heat inside.
Greenhouse "Butterfly" can be at any time to disassemble and put in another place. The doors of the room can be opened partially or completely. It provides free access to the sun and air.
If the gardener plans to grow crops in the cold, it is better to immediately plan the installation of the heating system.
There are different models of "butterflies". The interior of the room can be solid or divided into several sections. Since the “wings” of the structure can be opened on both sides, access to the plants becomes convenient.
Advantages and disadvantages
Like the other model, the “Butterfly” greenhouse has both advantages and disadvantages. Of the advantages are the following:
- resistance to bad weather;
- it is convenient to air it (the vents are provided in the design);
- long service life (shock absorbers contribute to the safety of moving parts);
- retains heat well;
- it grows all garden crops.
The disadvantages of the Butterfly greenhouse are also:
- fragility of sash loops;
- deformation of the lower arcs (if the greenhouse made of polycarbonate, and not from the film);
- poor-quality paint (when buying a finished product).
If you show ingenuity and diligence, these shortcomings can be easily eliminated. The hinges are regularly checked and replaced as necessary. In order to avoid deformation of the lower arcs, they are additionally strengthened. As for the low-quality paint - it is cleaned and the frame is re-painted.
Creating a project
There are drawings of such a greenhouse on the Internet. The height of a small mini-greenhouse is from 1 to 1.5 m, and its size is 2x4 m.
When designing, it is necessary to decide whether the owners will disassemble the greenhouse for the winter. On this depends the thickness of the polycarbonate and the type of structural fasteners. If the greenhouse is stationary, it is better to use a material of increased thickness and strength so that the greenhouse can withstand the harsh weather conditions.
Before you design a greenhouse, you need to decide which cultures will grow in it. Tall plants of ordinary height may not be enough.
Choosing a place to install
Equally important is the correct choice of location. The main thing is to focus on the illumination area. It is undesirable to install a greenhouse in shady places. Lack of sunlight inhibits the growth and development of all garden crops. It is best to put a greenhouse on a flat and bright place, to the south.
You can not put a greenhouse in the valley. Rain and snowmelt lead to crop loss. In addition, you need to know how deep the groundwater is. If they are close to the soil surface, the greenhouse will always be damp.It is necessary to exclude in advance the installation of the structure from the side where there are strong winds.
When choosing a place for the greenhouse, it is necessary to observe the established distances between the buildings that are already on the site.
What tools and materials will be useful
The basis of the greenhouse "Butterfly" can be both wooden and metal. Often gardeners prefer the metal frame. It is made of a profile pipe. If on the site there are good boards that are without use, you can use them. The wooden frame is convenient because it is easy to install without the use of welding and other tools. Metal is a durable material, but it must be protected from corrosion. To do this, use special tools.
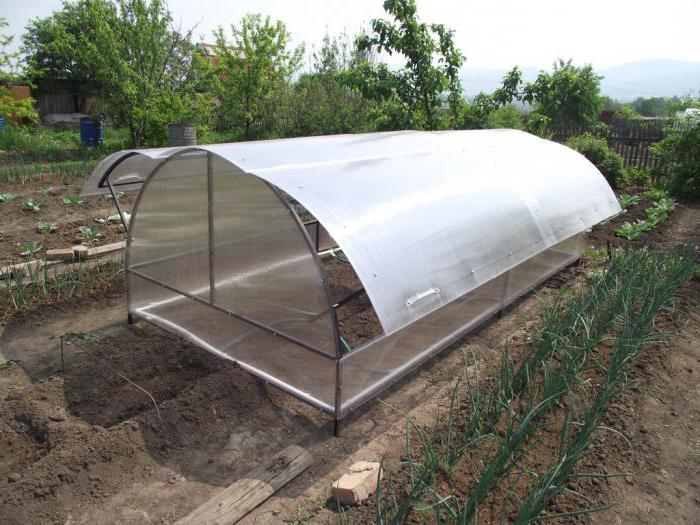
Sheath frame best polycarbonate - lightweight and durable material. It creates an optimal microclimate for plants. In application it is more convenient than polyethylene, it does not tear, it is easy to clean and wash.
From tools and materials you may need:
- drill;
- plastic caps;
- drill;
- set of screws;
- several hinges;
- handles for greenhouse covers.
Step-by-step instructions for assembling the Butterfly greenhouse
After developing a project plan and determining the location of the greenhouse, you can get down to business. The selected area is cleared of debris, grass and weeds, then remove the top layer of soil. Due to this, the site will become flat, and the greenhouse - sustainable.
It is not necessary to build a foundation for the Butterfly Greenhouse, but it serves as an additional support for the structure and makes it as strong as possible. Installing the foundation takes time and preparation, but in the future it is fully justified.
Construction of the foundation must begin with measurements and markup. After the dimensions are removed, it is necessary to prepare a trench. Inside the trench lay a layer of waterproofing material, then reinforce its corners, so that the soil does not crumble. When the preparatory work is completed, the pit is filled with a mixture, which consists of liquid cement and sand. The resulting base is complemented by the building in the form of a low base, slightly protruding outward.
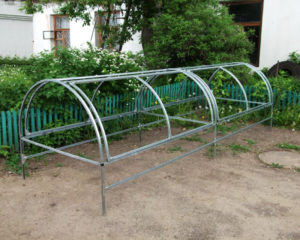
When the foundation becomes solid, you can install a greenhouse. Installation begins with the assembly of the frame. If metal is selected as the material for the frame, parts of the frame are fastened with a welding machine. When installing a wooden frame its elements are bolted. Once the frame is ready, it must be firmly fixed on the base of the foundation.
A greenhouse with a foundation serves much longer: it certainly will not be carried away by a strong gust of wind.
Assembling a "butterfly" on a wooden frame looks like this:
- dimensions are transferred to boards;
- cut out all the parts;
- fasten the boards according to the drawings;
- the frame should look like a house with a triangle-shaped roof;
- fix the structure with screws (2 pieces for each board);
- two wings fasten to the base - “wings”;
- cover the frame with polyethylene film.
 See also:
Greenhouses and greenhouses - what's the difference?
Answer the question, what is the difference between a greenhouse (stationary) and a greenhouse (seasonal), is possible only after consideration ...
Installation of a greenhouse on a metal frame:
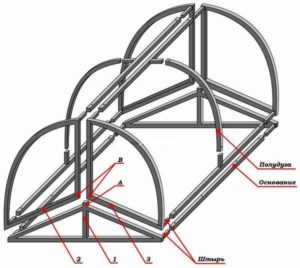
- assemble the frame according to the drawings, paying attention to the central beam;
- install the folding mechanism;
- assemble the frame;
- attach them to the beam in the center;
- mount side latches (they are needed in order to hold the sash when opening);
- sheathe the base with polycarbonate sheets.
The frames are immediately painted and antiseptic or anti-corrosion is applied on them. While the frame is drying, prepare other structural elements. Polycarbonate sheets are cut with a circular saw.
As fasteners, usually, used screws, thermal washers and special fasteners with seals. Experienced gardeners are advised to replace the screws on the washer. In their application, polycarbonate sheets are less heated in the heat and are not so strongly susceptible to deformation.
The ends of the greenhouse connect with special profiles. The place of each joint is treated with silicone-based sealant.
When reading the drawings, pay attention to the beam located in the center of the structure. It is designed to fix the loop. On the hinges they put on the shutters of the greenhouse - its “wings”.
Care and Maintenance Tips
With proper care, the Butterfly Greenhouse will always provide plants with the necessary microclimate for their growth and development. In the heat of the sash greenhouse must be opened, otherwise the plants will die from overheating. When it is cold outside, the doors close. In the same room you can plant several different garden crops, after separating them with polyethylene film.
Before the beginning of the winter season, the polycarbonate greenhouse is washed and cleaned of dust. If there is a need for repair, it must be done as quickly as possible in order to preserve and strengthen the greenhouse by the beginning of the winter cold. The polyethylene film is removed, washed and gently dried. It is best to store the disassembled structure in a dry utility room.
When inspecting the frame you need to make sure that there is no rust on it. If it appears, it is eliminated, and "weak" places paint and treat with anti-corrosion agents. It is also necessary to lubricate all moving parts to avoid rust.
All plants need to be removed from the ground before the cold comes. The land should rest in order for the next year's harvest to be no worse than before.
Greenhouse "Butterfly" is easy to manufacture. You can do it yourself. If the assembly and installation are done correctly, with good care this greenhouse will serve the owner for many years.
 (No ratings yet)