
 You need to understand that the timing when digging hazel grouse after flowering directly depends on the planting of this garden flower. Every year, somewhere in the period after flowering, the bulb of this plant is divided into two. They must be separated and planted in different places in order to get two independent beautiful, strong plants next year.
Important! Someone uses bulbs that appear along the edges to breed hazel grouse. But, children do not always grow up, so this method of reproduction can hardly be called successful.
In addition to the fact that the bulbs need to be dug up for proper reproduction in the coming year, there is one more reason for this. In the summer months, remaining in the ground, grouse bulbs become vulnerable to pests and various diseases. After all, after the flowering of a plant, the bulb begins to rest, and it absolutely cannot protect itself from pests.
Advice! When the grouse bulbs are dug, it is necessary to soak them for some time in a solution of potassium permanganate. Then let dry. If there is already some damage, rot, then they should be cleaned, and then carefully treated with iodine or brilliant green. And we will talk about lilies: planting and care in the open ground.
About the time of digging
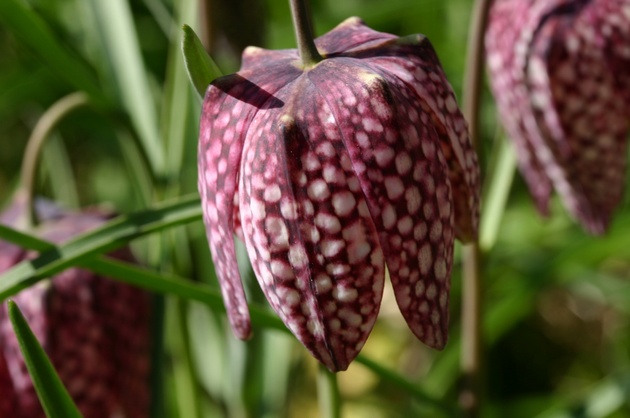
So, when answering the question of when to dig hazel grouse after flowering (see video), the question already contains the answer. This should be done immediately after flowering plants. Do not wait for the stems to dry. If the leaves of the hazel grouse began to turn yellow - this is the first signal that you can safely start digging the bulbs, separating them and preserving them for the winter, for the future spring planting.
As a rule, all bulbs can already be dug up until mid-July. By this time, the hazel grouse, delighting with flowering, had already fallen, and the leaves began to turn yellow, which was a signal to the beginning of the digging process. If the stem still stands straight and all the leaves are green, then digging can not be done. This indicates that the bulb has not yet fallen into a dormant state and is not ready for hibernation.
Advice! Do not hesitate to dig out. This is especially true for large bulbs, which, as soon as they hibernate, quickly begin to rot, or get sick with other diseases.
What are the features
At the beginning of the material, information was already mentioned that the dates when digging hazel grouses after flowering will differ in different sources. Someone replant their plants only after 2 or 3 years. There are reasons for this.
The fact is that the mother bulb can form several additional bulbs at once. But many species per year growth form not only the replacing bulb, but also the baby. When this part of the hazel grouse is dug up, the children are easily separated from it and often lost. But, next spring they can germinate (but this does not always happen). But when digging up the grouse bulbs for 2 or 3 years, the children are already growing up, and it is impossible to lose them. That is, it turns out they can be used to plant new beautiful plants in their flower beds.
Advice! Each gardener decides for himself to dig up grouse every year after flowering, or to do this with a frequency of several years. In principle, both methods are acceptable. But, with the annual excavation, there are great risks of being left without quality planting material.
Briefly about how to determine the timing of the transplant:
- The flowers have already faded, and the leaves have begun to turn yellow;
- As a rule, the leaves after the hazel grouse fades, begin to turn yellow within a month;
- Usually the time for digging bulbs is in June or July;
- In extreme cases, the plant can be dug up every two years. But whenever possible, it is best to do this every year;
- The larger the bulb, the result will be a lush flowering. Annual digging will help to achieve a beautiful and bright flowering in the end;
- If seed stalks have formed on the stem, then be sure to remove them;
- To dig out you need to choose not a rainy day;
- The bulbs are very fragile and if they are scooped up carefully, they can be damaged. So, when digging out, one should retreat 20 cm;
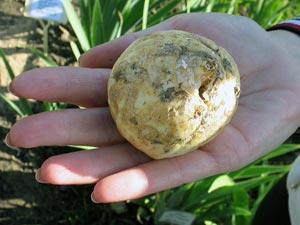
- The bulb must be dug up, and then pulled out by the stem of the plant. If the bulb is large enough, then it will be divided into two parts;
How to store bulbs after digging
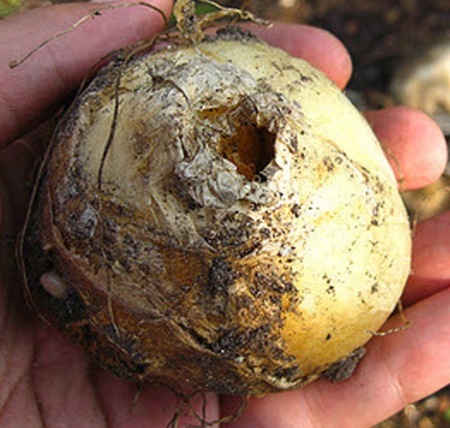
When bulb the hazel grouse was in the hands, it is necessary to remove the upper dry flakes from it and put it to dry. Good drying will be provided in a ventilated area. Do not immediately cut off the stem and roots: you need to let the bulb dry.
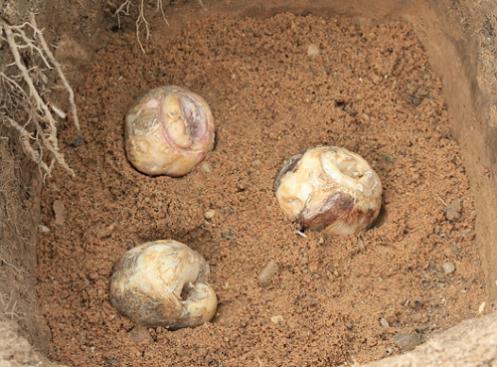
Within ten days, the root and stems dry out and it will already be easy to separate them. First you need to tear off the roots, and then pull out the dry stem from the bulb. As a result, there will be a through hole in the grouse bulb: this is normal, and it will be so for a long time. Now put the bulbs freely in the storage box. They must not touch.
To determine when to dig hazel grouse after flowering, you can easily and quickly yourself. The process must be carried out carefully so as not to damage the fragile planting material. After digging the grouse bulbs, it is necessary to ensure proper storage.